You can use the source control system as a repository so that you check out the code when adding changes, commit the changes back, look at different versions of the code, even revert back to a previous version.
I will present in this post the Subversion plug-in for Eclipse, how to install and use it.
First, you need to install it.
Open Eclipse, click on the HELP menu and then on the Install New Software menu option.
In the Install window, click the Available Software Sites link.
Copy the link of an Available Software Site from the Preferences window.
Paste the link in the WORK WITH field of the Install window:
Expand the Collaboration section:
Check all Subversive apps and complete the installation process.
You may need to restart Eclipse a few times during the installation.
Install the Subversive Connectors through the same process (Install window) using a different update site: Polarion - http://community.polarion.com/projects/subversive/download/eclipse/4.0/luna-site/
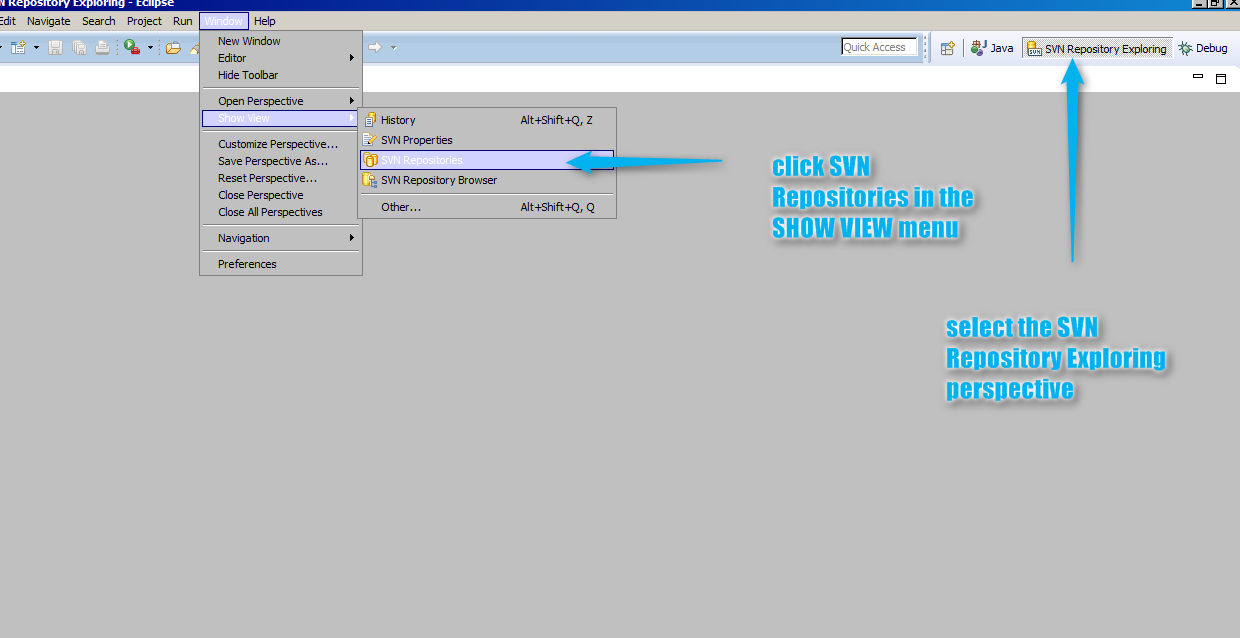
Next, click on the SVN Repository Exploring perspective.
Then, click on the Window menu option, Show View, SVN Repositories.
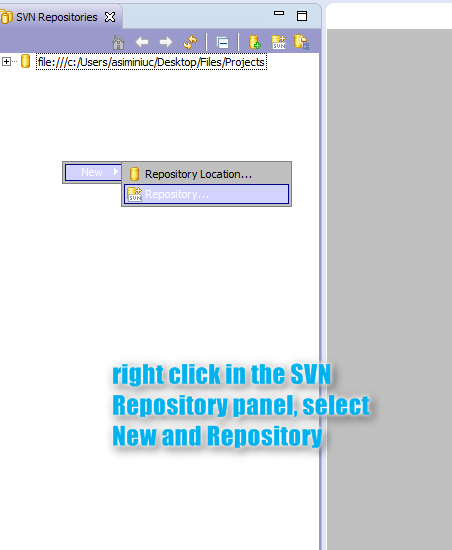
The SVN Repositories panel should be displayed.

To create a new repository, right click in the panel, select New and then Repository:

In the Create Repository window. click the Browse button and select an empty folder from your drive. Click OK to complete the creation of the new repository.
You will know that the new repository is created by checking the repository folder in Explorer.
The folder should have a few sub-folders and files used by Subversion to manage the code source control.
Even if the repository is created, it is not displayed yet in Eclipse, in the SVN Repositories panel.
To add it, right click again, select New and Repository Location.
Add the folder location of the repository and complete the process.
The repository should be displayed now in the SVN Repositories panel.
Add the Project Structure to the repository by right clicking on the repository, select New, select Project Structure. The project structure is added to the repository (project folder, truck, tags, branches):
To import an existing test automation project in the repository, right click on the repository, click Import, then select the test automation project:
You should be able to see the content of the test automation project and all its files in the repository.
Right click on the project folder and select Check Out to get the code:
After switching the perspective to Java, the checked out project is displayed in the Navigator panel.
Double click on a class to open it in the editor. You will notice that the status of the class is writable in the document status bar.
All source control functions can be accessed for the selected class file in the TEAM menu:
You can commit your changes to the repository using Commit:
You can look at the history of making changes to a document:
And you can compare different versions of the same document side by side:
Youtube video:


