Showing posts with label Selenium WebDriver. Show all posts

How to read test automation script parameters from a CSV file

If your test automation scripts are using parameters, the parameters values can be stored in a CSV file.

A CSV parser is needed for reading the content of the file and providing the data to the test automation script.

One of the parsers that can be used is OPEN CSV

First, download the Open CSV jar file:


Then, a
dd this jar file to the project in Eclipse:
  • right click on the project name
  • select Properties
  • select Java Build Path
  • select the Libraries tab
  • click the Add External Jars button
  • browse to the folder where the Open CSV Jar file is saved
  • select the jar file
  • click OK to save the changes


Display the Package Explorer view in Eclipse by going to:


Menu --> Window --> Show View --> Package Explorer

Expand the project in Package Explorer, expand Referenced Libraries and then expand the open CSV jar:


Expand the com.opencsv package.


The package includes multiple classes such as 
  • CSVParser
  • CSVReader
  • CSVWriter
  • CSVIterator


We will use CSVReader for reading the content of a text file.

Expand the CSVReader class and take a look at the methods:


For the purpose of reading the content of the text file, we need:

CSVReader(Reader) constructor
The constructor will create the csv file object.

readAll() method
This method will read the file content and provide it as a list of String arrays.

close()
This method will close the csv reader object.


The text file includes multiple lines of text.

Each line has multiple values separated by -:

keyword-sortorder-resultnumber
java-author-10
oracle-date-20
microsoft-title-15


How does the code looks like?


import java.io.FileReader;
import java.io.IOException;
import java.util.List;
import com.opencsv.CSVReader;

public class Class1 {

 public static void main(String[] args) throws IOException {

  String filePath = "c:\\temp\\parameters.txt";

  CSVReader csvSource;
  List<String[]> allLines;  
  
  FileReader fileReader = new FileReader(filePath);

  csvSource = new CSVReader(fileReader);
  allLines = csvSource.readAll();

  for (int lineNo = 0; lineNo < allLines.size(); lineNo++) {
    String[] currentLineArray = allLines.get(lineNumber);
    String currentLine = currentLineArray[0];
    String[] values = currentLine.split("-");

    for (int index = 0; index < values.length; index++)
      System.out.println(values[index]);

  }
 }
}


Lets see how we can apply this code to a WebDriver script.

The following script is very simple:
  • it opens a site (http://www.vpl.ca)
  • executes a keyword search (for the Java keyword)
  • checks that the url of the results page is correct


The parameter to be added to the script corresponds to the Java keyword.

After adding the parameter, we will be able to run the script for all keyword values stored in the text file.


@Test
public void testPage() throws InterruptedException { 

  WebDriver driver = new FirefoxDriver();
  driver.get("http://www.vpl.ca");

  WebElement searchField;
  searchField = driver.findElement(
           By.xpath("//input[@id='globalQuery']"));

  searchField.click();
  searchField.sendKeys("java");

  WebElement searchButton;
  searchButton = driver.findElement(
          By.xpath("//input[@class='search_button']"));

  searchButton.click();

  Thread.sleep(5000);
  String resultsPageUrl = "t=keyword";
  assertTrue("this is not the results page", 
             driver.getCurrentUrl().indexOf(resultsPageUrl) >= 0);

  driver.quit(); 
} 


The test script updated with parameters is below.


import static org.junit.Assert.*;
import java.io.FileReader;
import java.io.IOException;
import java.util.Arrays;
import java.util.Collection;
import java.util.List;
import org.junit.Test;
import org.junit.runner.RunWith;
import org.junit.runners.Parameterized;
import org.junit.runners.Parameterized.Parameters;
import org.openqa.selenium.By;
import org.openqa.selenium.WebDriver;
import org.openqa.selenium.WebElement;
import org.openqa.selenium.firefox.FirefoxDriver;

import com.opencsv.CSVReader;

@RunWith(value = Parameterized.class)
public class tests {
 
  private String stringValue;
 
  public tests(String stringValue) {
     this.stringValue = stringValue;
  }
     
    @Parameters
    public static Collection< object > data() throws IOException {
  
      /*
       * if the values of the parameters are not read from a file,
       * the data array is created this way.

            Object[][] data = 
               {
                  {"java-author-10"},
                  {"oracle-date-20"},
                  {"microsoft-title-15"}
               };
     
       * if the values of the parameters are read from a file,
       * the data array needs to be populated from the file
     */
  
     String filePath = "c:\\temp\\parameters.txt";
  
     CSVReader csvSource;
     List< string > allLines; 
             
     csvSource = new CSVReader(new FileReader(filePath));
     allLines = csvSource.readAll();
     csvSource.close();
  
     Object[][] data = new Object[allLines.size()][];
  
     for (int lineNumber = 0; lineNumber < allLines.size(); lineNumber++) 
         data[lineNumber] = allLines.get(lineNumber);             
      
     return Arrays.asList(data);       
  }
  
  @Test
  public void testPage() throws InterruptedException {

     String[] values = stringValue.split("-");
     String keyword = values[0];
  
     WebDriver driver;
     driver = new FirefoxDriver();
   
     driver.get("http://www.vpl.ca");
   
     WebElement searchField;
     searchField = driver.findElement(
                By.xpath("//input[@id='globalQuery']"));
   
     searchField.click();
     searchField.sendKeys(keyword);
   
     WebElement searchButton;
     searchButton = driver.findElement(
                By.xpath("//input[@class='search_button']"));   

     searchButton.click();
   
     Thread.sleep(5000);
   
     String resultsPageUrl = "t=keyword";
     assertTrue("this is not the results page", 
                driver.getCurrentUrl().indexOf(resultsPageUrl) >= 0);
   
     driver.quit();
                 
  }
}

Page Object Methods Should Return Objects

Learning the page object model is a very important skill for test automation with Selenium.


When learning test automation with Selenium, the Page Object Model is useful for creating classes that correspond to site pages (or components of pages) so that the WebDriver APIs are moved from the test scripts to the page object classes.


After you create page object classes, make sure that each page object method returns either

- A PAGE OBJECT: if the method generates a page change or a new page (example: changing the sort order for a web page will reload the page)

or 

- THIS KEYWORD: if the method's action does not change anything in the page (example: typing a keyword into a textbox does not change anything else in the page)


To see the benefits of returning objects from page object methods, lets  look at a simple test case with the following steps:

1. open the home page of a web site

2. do a keyword search

3. after the results page is loaded, change the sort order

4. after the results page reloads as a result of changing the sort order, select a different results page (page number 5)

5. after the 5th results page is loaded, change the number of results displayed in the page

6. after the page reloads, select one of the results

7. after the result's details page is loaded, confirm that the result's price is valid

The test script for the test case needs 3 page object classes:


public class HomePage
{
public void search()
}

public class ResultsPage {
public void changeSortOrder(String sortOrder)

public void changeResultsPerPage(int number)

public void changePage(int pageNumber)

public void selectResult(int index)
}

public class DetailsPage
{
public Boolean validPrice()
}


None of the page object methods returns an object.

The test script looks as follows:


@Test
public void testValidPrice()
{

HomePage homePage = new HomePage();

homePage.search();

ResultsPage resultsPage = new ResultsPage();

resultsPage.changeSortOrder("author");

resultsPage.changePage(5);

resultsPage.changeResultsPerPage(25);

resultsPage.selectResult(3);

DetailsPage detailsPage = new DetailsPage();

assertTrue(detailsPage.validPrice(), true);

}


The problems of the test script are evident:

- too many new objects are being created (homePage, resultsPage, detailsPage)


- each action is separate


- the flow of the test script does not follow user actions: when the user changes the sort order on the ResultsPage, a new ResultsPage is created as a result


Lets change the page object classes so that all page object methods return objects:


public class HomePage
{
public ResultsPage search();
}

public class ResultsPage
{

public ResultsPage changeSortOrder(String sortOrder)

public ResultsPage changeResultsPerPage(int number)

public ResultsPage changePage(int pageNumber)

public DetailsPage selectResult(int index)
}

public class DetailsPage
{
public Boolean validPrice()
}

@Test
public void testValidPrice()
{

DetailsPage detailsPage = (new HomePage()).search().changeSortOrder("author").changePage(5).changeResultsPerPage(25).selectResult(3);

assertTrue(detailsPage.validPrice(), true);

}


Multiple improvements result from the new page object classes:

- multiple methods can be chained

- the test script is much more compact

- less objects are created    


Test Automation Tips - dont use WebDriver APIs in your test script

If your WebDriver test scripts look similar to the following script, you are not doing test automation correctly:

@Test
public void testFirstResult() {

driver.get("http://www.vpl.ca");   


WebElement searchField = driver.findElement(By.xpath("//input[@id='globalQuery']"));


searchField.click();           

searchField.sendKeys("java");
    
WebElement searchButton = driver.findElement(By.xpath("//input[@class='search_button']"));

searchButton.click();        
            
WebElement searchResultLink = driver.findElement(By.xpath("(//a[@testid='bib_link'])[1]"));
    
searchResultLink.click();
        
WebElement bookTitleElement = driver.findElement(By.xpath("//h1[@id='item_bib_title']"));    
String bookTitleValue = bookTitleElement.getText();
      
assertEquals(bookTitleElement.isDisplayed(), true); 
assertTrue(bookTitleValue.length() > 0);
    
WebElement bookAuthorElement = driver.findElement(By.xpath("//a[@testid='author_search']"));
String bookAuthorValue = bookAuthorElement.getText();
      
assertEquals(bookAuthorElement.isDisplayed(), true); 
assertTrue(bookAuthorValue.length() > 0);

}


The script includes many WebDriver API objects and methods:


  • WebElement objects
  • driver.findElement() method
  • isDisplayed() method
  • getText() method
  • click() and sendkeys() methods()
  • get() method


Even if this script works correctly, it is very difficult to change and maintain.

Imagine having 50 scripts similar to this and some of them failing one day because of site changes (UI and functional).

Modifying 50 scripts would be a very difficult and time consuming task.

To remove the WebDriver API objects and methods from the test script, you should start using the Page Object Model.

"A page object wraps an HTML page, or fragment, with an application-specific API, allowing you to manipulate page elements without digging around in the HTML." Martin Fowler

What you need to do is create classes that correspond to web pages or web page components and implement the interaction with the site inside of them.

These classes will be used then by the test scripts.

All WebDriver API methods will be moved from the test scripts to the page object classes so a test script looks as follows:

@Test
public void testResultsInfo() throws InterruptedException{        

HomePage home = new HomePage(driver);


assertTrue(home.correctTitle());          

  
ResultsPage results = home.search();

assertTrue(results.correctTitle());


assertTrue(results.keywordDisplayed());            


assertTrue(results.resultsCount() > 0);         


}  


No WebDriver API classes and methods are included in this script.

The script uses 2 page object classes (HomePage and ResultsPage) that implement all interactions with the web pages.


Read more about Page Object Model on these 2 links:

http://martinfowler.com/bliki/PageObject.html

https://code.google.com/p/selenium/wiki/PageObjects


Test Automation Tips - do not automate the regression test cases

Test automation projects are development projects.

For each test case to be automated, code needs to be written, maintained and debugged.

The effort for automating all regression test cases is very high and the benefits limited.

Instead, use the following strategies for test automation:

1. automate the scenarios from the MONEY PATH; automate all scenarios that confirm that the users can pay for the products

2. automate scenarios for NEW FEATURES

3. add test scripts for NEW BUGS to be sure that these bugs will not appear again

4. focus on positive scenarios; there is limited value for automating negative scenarios

5. focus on functional scenarios; there is limited value on automating UI scenarios


Test Automation tips - use a code source control system

As soon as the test automation project has more than a few scripts, the test automation process should start including a source control system.

This allows having different versions of the code, rolling back to a previous version, having a history of all code changes, etc.

It makes sense to use source control for test automation projects as these are development projects.

For source control, typical options are:

- Subversion (https://subversion.apache.org/) if you want to keep the code changes locally or on a server

- GitHub (https://github.com/) if the code should be stored online

Test Automation tips - store all locators in one class

When starting on test automation, a frequent mistake is that

each page object class file has its own locators defined as class members:


This can be corrected easily by 

moving the locators from all page object class files to a single locator class file.


Solution

A new class is created and the locators from all page object classes are moved into it:


The code from the test class is changed then to use the new locator class:


You can remove the locator members from the HomePageScripts class and just use the Locator class members directly in the WebDriver commands like

WebElement searchLabel = driver.findElement(By.xpath(Locators.searchLabelLocator));If both the Locators class and the page object classes are in the same package, nothing else is needed.


If they are in different packages, you will need to import the Locator class package in the page object class file.

Test automation tips - create the correct project folder structure

When starting on test automation, a frequent mistake is that 

all project files are created in the src folder of the Eclipse project:


The src folder includes 

- test classes (HomePageScripts.java)

- page object classes (HomePage.java and ResultsPage.java)

- any other project files


This can be corrected easily by creating folders in the project for specific purposes:

Example

framework folder

            page object class folder

            locator class folder

test scripts folder


Solution


Before working on the project folder structure, lets investigate a bit the project:

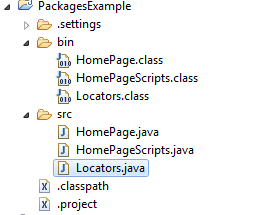
- source java files are stored in the src folder

- class files (created when the source files are compiled; the class files are needed for executing the code) are stored in the bin folder


The classpath file has 2 rules for this:

- first rule says that the source files are in the src folder

- the second rule says that, by default, all class files are created in the bin folder


Multiple steps are needed for getting the correct project structure:

1. remove the existing classpath entries


2. create a test folder under the src folder: src/test


3. add the following classpath entry


This rule means that for all java files from src/test, the class files will be created under target/test-classes.


4. build the project.

the target/test-classes folders are created as a result of the project build:


5. create the com.testproject.java package under the src/test folder:


6. move the HomePageScripts.java file to src/test/com/testproject/java


7. build the project


8. the following folders are added under target/test-classes: com/testproject/java

the HomePageScript.class file is stored in target/test-classes/com/testproject/java:


9. similarly, create a main folder under src


10. add a new entry to classpath for the src/main folder


This rule says that for all java files stored under src/main, the class files will be created under target/classes.


11. build the project


12. the target/classes folder is created


13. add the following package to src/main: com.testproject.java.framework.pageobject


14. move the page object class (HomePage.java) to the src/main/com/testproject/java/framework/pageobject


15. build the project and confirm that the class file is created in target/classes/com/testproject/java/framework/pageobject:


16. add the following package to src/main: com.testproject.java.framework.locators


17. move the Locators.java file to src/main/com/testproject/java/framework/locators


18. build the project


19. confirm that the Locators.class file is created in target/classes/com/testproject/java/framework/locators


20. open all java files and add the packages where different classes are stored:


21. run the project


At this moment, the project structure is much better than when we started:

SRC

    MAIN  --> folder used for framework files

       COM

          TESTPROJECT

              JAVA

                  FRAMEWORK

                      LOCATORS
                             Locators.java

                      PAGEOBJECTS
                             HomePage.java


   TEST  --> folder used for the test scripts

       COM

           TESTPROJECT

                JAVA
                    HomePageScripts.java
   

Test Automation for the Londondrugs.com home page

The following 2 videos show how to create test automation scripts for the home page of the www.londondrugs.com web site. 

Please click on HD and then on 720 p to view the video clearly.

This short project goes through the following phases: 

1. identify the test cases to be automated for the home page of the site 

2. create the locators for elements used in the scripts from the home and results pages 

3. create the project in Eclipse 

4. add the Selenium jar files to the project 

5. create a new class 

6. add a JUNIT test script to the class 

7. write the code for the script 

8. debug errors in the code 

9. create the setUp and tearDown JUNIT methods 

10. optimize the script by:


  • removing any hard coded values
  • replacing implicit with explicit waits

11. create classes for each page and move the web driver code from the test script to class methods


Store your test automation code in a source control system (Subversive)

One thing that you should use as soon as your test automation work gets serious is a source control system for your code.

You can use the source control system as a repository so that you check out the code when adding changes, commit the changes back, look at different versions of the code, even revert back to a previous version.

I will present in this post the Subversion plug-in for Eclipse, how to install and use it.

First, you need to install it.

Open Eclipse, click on the HELP menu and then on the Install New Software menu option.


In the Install window, click the Available Software Sites link.

Copy the link of an Available Software Site from the Preferences window.

Paste the link in the WORK WITH field of the Install window:


Expand the Collaboration section:


Check all Subversive apps and complete the installation process.
You may need to restart Eclipse a few times during the installation.


Install the Subversive Connectors through the same process (Install window) using a different update site: Polarion - http://community.polarion.com/projects/subversive/download/eclipse/4.0/luna-site/
 

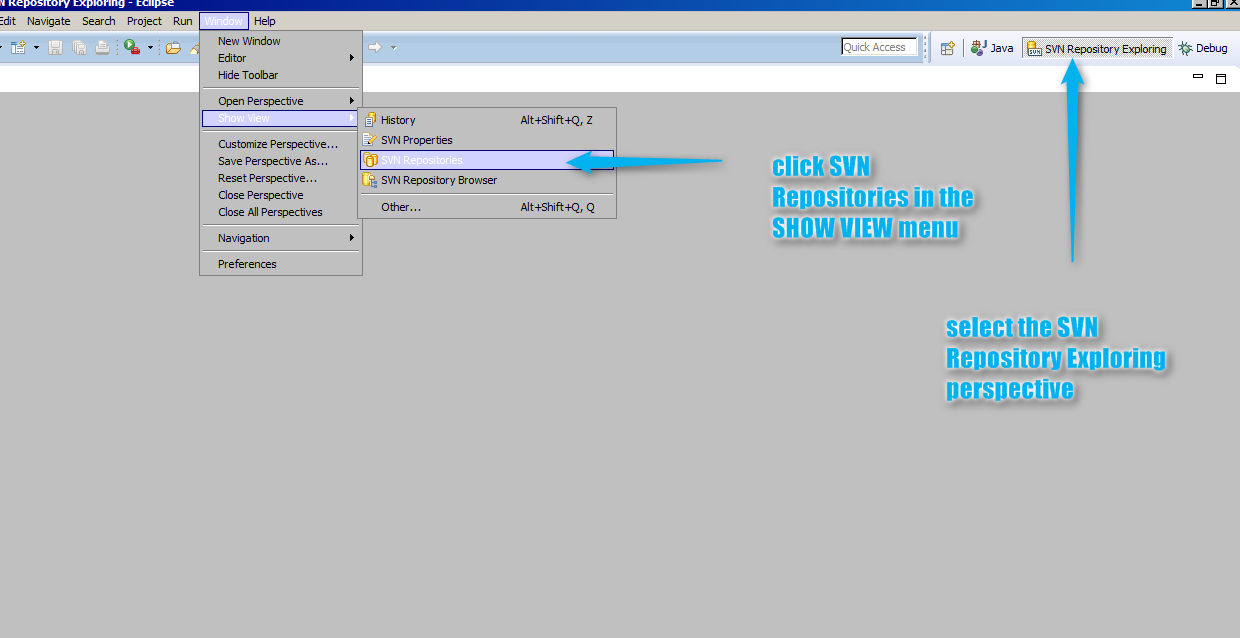
Next, click on the SVN Repository Exploring perspective.

Then, click on the Window menu option, Show View, SVN Repositories.

The SVN Repositories panel should be displayed.


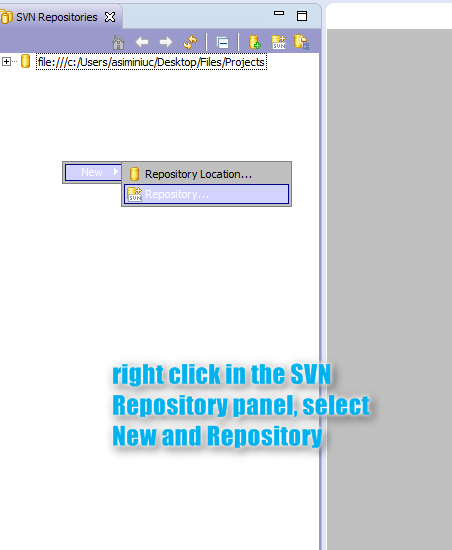
To create a new repository, right click in the panel, select New and then Repository:


In the Create Repository window. click the Browse button and select an empty folder from your drive. Click OK to complete the creation of the new repository.


You will know that the new repository is created by checking the repository folder in Explorer.

The folder should have a few sub-folders and files used by Subversion to manage the code source control.


Even if the repository is created, it is not displayed yet in Eclipse, in the SVN Repositories panel.

To add it, right click again, select New and Repository Location.

Add the folder location of the repository and complete the process.


The repository should be displayed now in the SVN Repositories panel.


Add the Project Structure to the repository by right clicking on the repository, select New, select Project Structure. The project structure is added to the repository (project folder, truck, tags, branches):


To import an existing test automation project in the repository, right click on the repository, click Import, then select the test automation project:


You should be able to see the content of the test automation project and all its files in the repository.

Right click on the project folder and select Check Out to get the code:


After switching the perspective to Java, the checked out project is displayed in the Navigator panel.

Double click on a class to open it in the editor. You will notice that the status of the class is writable in the document status bar.


All source control functions can be accessed for the selected class file in the TEAM menu:


You can commit your changes to the repository using Commit:


You can look at the history of making changes to a document:


And you can compare different versions of the same document side by side:


Youtube video: